Blade shape guides can look simple, but a wrong profile can weaken product fit. I choose blade shapes by use case, market, and production risk.
Buyers should choose pocket knife blade shapes by matching the target user, cutting tasks, legal and retail channel expectations, grind style, steel choice, manufacturing tolerance, packaging claims, and RFQ details. The right shape is the one a factory can repeat and the buyer can sell honestly.
Quick buyer brief:
- Answer: Match blade shape to target market, cutting tasks, grind, steel, cost, QC, and product claims.
- Buyer context: This helps knife brands, importers, wholesalers, and sourcing managers turn blade ideas into manufacturable SKUs.
- Key checks: Use case, blade length, tip style, belly, grind, thickness, steel, lock type, finish, packaging claim, and inspection records.
Developing a folding knife line for your brand?
Vast State supports OEM/ODM folding knife projects, including blade steel, lock structure, handle material, finish, logo method, packaging, and quality inspection planning.
When a customer asks me which blade shape is best, I do not answer with one shape name. I ask where the knife will sell, who will use it, what the target price is, and what the product page will promise. A drop point, clip point, sheepsfoot, wharncliffe, tanto, spear point, or trailing point can all be useful. But each one changes the blade blank, grinding plan, edge geometry, packaging language, and final inspection standard.
Why Should Blade Shape Start With the Target User and Sales Channel?
A blade shape can look attractive in a catalog, but the wrong match can create returns, slow sales, or production waste. I start with the buyer.
Blade shape should start with the target user, sales channel, price range, and main cutting tasks. These inputs decide whether the knife needs belly, point control, straight-edge control, tip strength, simple sharpening, or strong visual differentiation.

I choose the blade shape after I understand the SKU
In OEM and ODM knife development, I rarely treat blade shape as a style choice only. I treat it as a product direction. A buyer building a general EDC line may need a safe and familiar profile with broad appeal. A buyer building a warehouse utility SKU may care more about straight-edge control and easy sharpening. A buyer building an outdoor folder may want enough belly for slicing and enough tip strength for daily field tasks. A buyer building a private label catalog may need several blade shapes across different price points so the range looks complete without adding too much production risk.
Sales channel also matters. A knife sold through a broad outdoor distributor should be easy to explain. A specialty EDC model can take a more distinct profile if the buyer's audience understands it. A budget item should avoid shapes that need heavy grinding time or too much hand correction. A higher-positioned item can carry more refined geometry, but it still needs stable production. I ask buyers to define use case before drawing the final profile because the profile affects blade blank nesting, stock thickness, grind height, sharpening angle, and packaging claims.
| Buyer input | What I check | Why it matters |
|---|---|---|
| Sales channel | Outdoor, EDC, wholesale, private label, industrial utility | It guides how familiar or specialized the profile should be |
| Main task | Slicing, opening cartons, camping prep, rescue utility, general cutting | It decides belly, straight edge, and point control |
| Price range | Entry, mid-range, higher-positioned SKU | It controls grinding complexity and finish level |
| Brand style | Clean utility, rugged outdoor, modern EDC, catalog variety | It keeps the blade shape aligned with the brand promise |
OEM/ODM RFQ Checklist
Prepare these details to help Vast State review your project and provide a more accurate quotation.
| RFQ Field | What to Prepare |
|---|---|
| Project type | OEM from drawing / ODM private label / wholesale catalog |
| Product category | Folding knife / fixed blade / multi-tool / outdoor tool |
| Design status | Idea / sketch / 2D drawing / 3D CAD / physical sample |
| Target price | Ex-factory target price or retail price range |
| MOQ expectation | 500 / 1,000 / 3,000 / 5,000+ pcs |
| Logo method | Laser engraving / etching / printing / molded logo |
| Packaging | Standard packaging / custom retail box / Amazon-ready |
| Market | USA / EU / Japan / Korea / Middle East / other |
| Compliance needs | Buyer-specified testing / documentation / labeling |
| Timeline | Sample deadline / mass production deadline |
How Do Drop Point and Spear Point Shapes Fit General Utility Projects?
Some projects need broad appeal more than strong visual drama. A familiar profile can reduce buyer hesitation and simplify production.
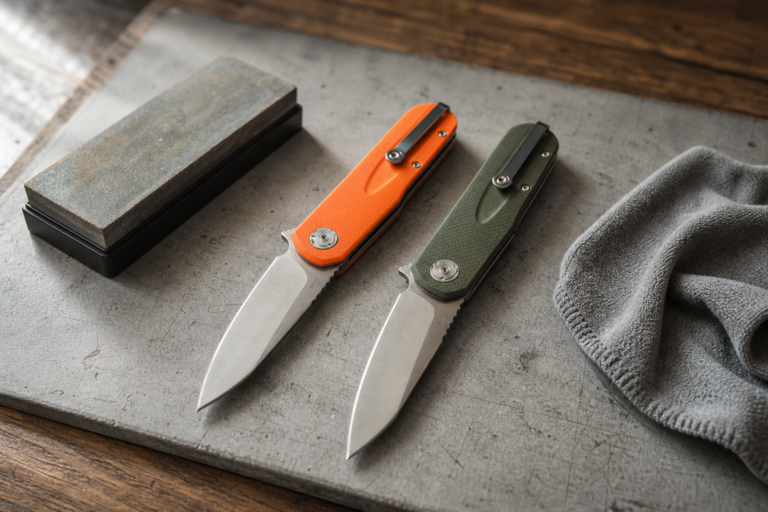
Drop point and single-edge spear point styles often fit general utility projects because they offer controlled tips, balanced cutting curves, and easy buyer understanding. I use them when versatility, repeatability, and mainstream appeal matter.

I use familiar profiles when the buyer needs low friction
A drop point is commonly described as a blade profile where the spine slopes toward the tip. In practical OEM work, I like this profile because it is easy for many buyers and end customers to understand. It can support a strong enough tip, a useful cutting belly, and a balanced visual line. It also gives the factory a clear path for blank cutting, bevel grinding, and sharpening. This does not mean every drop point is good. A short blade with too much belly can feel awkward. A long blade with a low tip can lose the clean line that customers expect.
A single-edge spear point inspired profile can also work for general utility if the design remains practical and does not create double-edge compliance issues. I normally keep the geometry simple for folding knives. A centered tip can look balanced, but the grind, swedge, and spine thickness must still support the intended task. For private label buyers, these profiles are useful because they do not need long education in product listings. The main job is to tune blade length, blade height, tip position, grind height, and handle balance so the final knife feels intentional instead of generic.
| Profile direction | Strong fit | Manufacturing focus |
|---|---|---|
| Drop point | Broad EDC, outdoor utility, catalog folders | Tip position, belly control, grind symmetry |
| Single-edge spear point | Modern EDC, balanced visual SKU | Centerline control, swedge limits, compliance review |
| Modified drop point | Brand differentiation with low risk | Keep shape readable and sharpening simple |
| Wide drop point | Outdoor and slicing-oriented models | Control blade weight and closed handle fit |
When Do Clip Point and Trailing Point Shapes Make Sense?
A fine-looking point can sell a classic image, but it can also create thin-tip complaints. I use these shapes with clear limits.
Clip point and trailing point profiles make sense when the buyer wants a classic, outdoor, or slicing-oriented look. They need careful tip thickness, grind control, and honest product claims because extreme versions can be less forgiving.

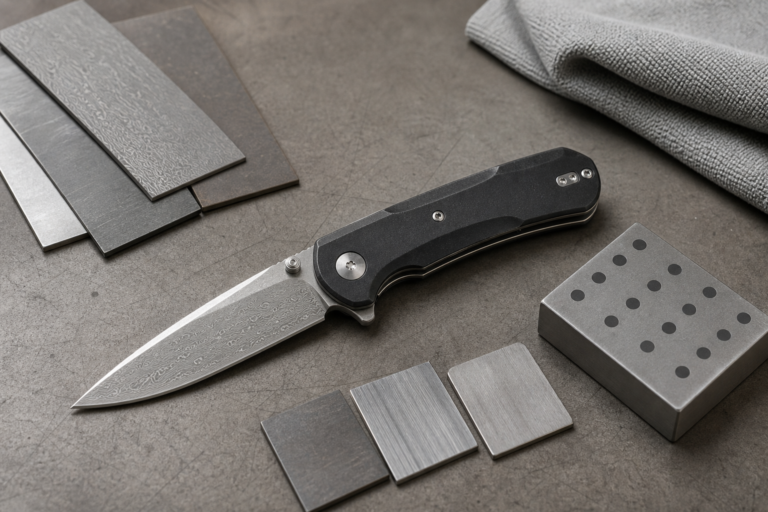
I protect the tip before I approve the sample
A clip point usually has the appearance of material removed from the forward spine area. This can create a finer point and a classic look. In B2B projects, I see clip point profiles used when the buyer wants a traditional outdoor feel, a heritage catalog style, or a more detailed tip area. But the thinner the forward section becomes, the more carefully we need to check stock thickness, swedge depth, heat treatment, and customer expectations. I do not want a product photo to promise a strong utility knife while the tip geometry says something different.
Trailing point profiles move the tip upward and often create more belly for slicing. This can be useful for outdoor or food-prep-related cutting tasks in a camping tool range. But a strong upward curve can also make the closed blade harder to package inside a compact handle. It may increase blade height, affect handle pocket shape, and reduce commonality with other parts. For OEM buyers, these profiles should be chosen when the function and catalog story support them. They are not the easiest default shapes for every folding knife. I normally suggest moderate versions first, then adjust the curve after sample handling.
| Shape | Best product direction | Risk to control |
|---|---|---|
| Clip point | Classic outdoor, heritage folder, detail-oriented SKU | Thin forward area and tip durability |
| Modified clip point | Balanced EDC with classic style | Swedge depth and sharpening consistency |
| Trailing point | Slicing-oriented outdoor or camping product | Blade height, closed fit, and packaging size |
| Extreme curve | Strong visual differentiation | Higher grinding time and narrower use case |
How Should Tanto, Sheepsfoot, and Wharncliffe Shapes Be Used Carefully?
Distinct shapes can help a brand stand out, but they can also confuse buyers if the task story is weak. I define the use first.
Tanto, sheepsfoot, and wharncliffe shapes should be used when their geometry supports the SKU. Buyers should check point style, straight-edge control, sharpening path, safety expectations, and whether the shape matches the retail claim.

I separate visual identity from real product fit
Tanto-style blades can create a strong angular look. They may fit a modern EDC line when the buyer wants a bold profile and a clear secondary edge transition. But they are not always the easiest choice for broad utility. The transition area needs consistent grinding, and the product listing should not overpromise if the knife is mainly for daily cutting tasks. I also check whether the tip and front edge can be finished consistently at the buyer's target cost.
Sheepsfoot and wharncliffe-inspired profiles are useful when the buyer wants strong straight-edge control, simple push-cut behavior, and reduced point emphasis. I often consider them for work utility, rescue-oriented product lines, or compact EDC SKUs where controlled cutting matters. But straight-edge profiles can look plain if the handle design is weak. They also need careful sharpening consistency because any unevenness is easy to see along the straight edge.
The practical rule is simple. A distinct blade shape should earn its place in the SKU. It should support the target task, the retail claim, and the production method. If the buyer only wants a dramatic shape for photos, I usually suggest simplifying it before tooling.
| Shape | Practical value | Buyer caution |
|---|---|---|
| Tanto style | Angular look and defined front section | Grind transition must be repeatable |
| Sheepsfoot | Controlled straight-edge utility | Product story should explain the reduced point emphasis |
| Wharncliffe | Precise straight-edge cutting feel | Straight edge shows sharpening errors quickly |
| Modified versions | Better balance for EDC lines | Avoid making the profile hard to classify |
How Do Blade Shape, Grind, and Edge Geometry Work Together?
A shape name alone cannot make a knife cut well. Poor geometry can make a good steel feel disappointing.
Blade shape, grind, and edge geometry work together. Buyers should review blade thickness, grind height, thickness behind the edge, edge angle, steel toughness, and heat treatment before approving a blade profile.

I never approve a profile without checking the edge plan
Knife buyers often compare blade shapes by name. In production, I also compare how the steel will be ground and sharpened. Knife Steel Nerds explains that cutting ability is controlled by sharpness, edge angle, and thickness behind the edge, and that thinner or more acute geometry can improve cutting while reducing strength margins. That is why I treat geometry as a balance, not a slogan. A wide drop point with a thick low grind can feel worse in cutting than a simpler blade with a better grind. A straight-edge wharncliffe can cut well, but it still needs the right thickness and edge finish.
This is where steel and heat treatment enter the discussion. A tougher steel can allow a slightly more performance-focused edge for some projects. A high-wear steel can keep an edge longer, but it may increase grinding and sharpening time. Hardness records also matter. NIST's Rockwell hardness guidance explains that good practice helps reduce hardness measurement errors, which is why I like buyers to request clear HRC targets and batch records when steel choice is important. Blade shape is only the outside line. The cutting result comes from the whole system.
| Design element | What it changes | RFQ detail to define |
|---|---|---|
| Blade thickness | Strength, weight, cutting feel | Stock thickness and tolerance |
| Grind height | Slicing feel and appearance | Flat, hollow, saber, or other grind direction |
| Thickness behind edge | Cutting ability and edge support | Target range or approved sample standard |
| Edge angle | Sharpness feel and durability balance | Sharpening angle and inspection method |
What Manufacturing Risks Come From Complex Blade Shapes?
A complicated blade can look impressive in a rendering, but the factory must repeat it hundreds or thousands of times. I check repeatability early.
Complex blade shapes can create risks in blank cutting, CNC machining, grinding, heat treatment distortion, finishing, sharpening, and assembly fit. Buyers should ask for manufacturability review before approving tooling or mass production.

I look for cost before the sample becomes expensive
Blade shape changes the whole manufacturing path. A simple profile can be laser cut, waterjet cut, stamped, or machined with fewer surprises. A complex recurve, deep swedge, compound tanto transition, or very tall blade can increase cutting waste, fixture needs, grinding time, and inspection points. It can also make sharpening slower because the operator has to follow a changing edge line. If the project target is a cost-sensitive wholesale SKU, that extra time can damage the margin.
Heat treatment can also reveal shape problems. Thin tips, deep internal curves, and uneven blade mass can be more sensitive to distortion. After heat treatment, correction adds labor and risk. Finishing is another issue. Stonewash, satin, bead blast, coating, and polishing all behave differently around sharp transitions and curves. A surface that looks clean on a simple drop point may look uneven on a highly detailed profile.
I usually ask for a manufacturability check before finalizing the blade drawing. This includes blank nesting, grind access, heat treatment risk, closed-handle fit, lock interface, sharpening method, and visual inspection criteria. It is easier to adjust a drawing than to fix a mass production problem.
| Risk area | What can happen | Practical control |
|---|---|---|
| Blank cutting | Material waste or rough internal curves | Review nesting and cutting method |
| Grinding | Uneven bevels or slow production | Confirm grind access and sample standard |
| Heat treatment | Warping near thin or uneven areas | Check shape balance and steel thickness |
| Assembly | Blade may not close cleanly into handle | Review blade height, stop pin, and pivot layout |
How Should Blade Shape Affect Packaging and Product Claims?
Packaging can oversell a knife faster than the blade can prove itself. I keep claims close to the design.
Blade shape should affect packaging claims, product page language, and buyer instructions. Claims should match the profile, steel, edge geometry, inspection records, and intended market without exaggerating performance or use.

I write claims that the design can support
For B2B customers, the blade shape is not only an engineering choice. It becomes part of the product story. A drop point can be described as a versatile utility profile if the grind and steel support that claim. A sheepsfoot or wharncliffe-style profile can be described around controlled straight-edge cutting if the edge line is clean and the handle allows good control. A tanto-style profile can be positioned as a modern angular design, but I avoid claims that create unrealistic expectations.
Packaging and product pages should also respect local market rules and retailer comfort. Different countries and channels may treat knife descriptions differently. This article is not legal advice, but I always tell buyers to review local regulations and retailer guidelines before approving claims. The American Knife and Tool Institute provides useful knife definition resources, but buyers still need market-specific checks.
The ISO supply chain guide also reminds buyers that ISO 9001 does not replace clear product requirements. I apply the same thinking to packaging. A quality system cannot fix vague claims. Buyers should define what the product is for, what it is not for, what tests or checks support the claim, and what language should appear on the package.
| Claim area | Better wording direction | Evidence to keep |
|---|---|---|
| Utility | General cutting, outdoor prep, daily tasks | Approved sample, edge standard, material spec |
| Straight-edge control | Controlled cuts and easy edge contact | Blade drawing and sharpening check |
| Modern style | Angular profile or distinctive line | Approved render and physical sample |
| Quality | Consistent fit, finish, and inspection | QC checklist and batch records |
What Should Buyers Put in a Blade Shape RFQ?
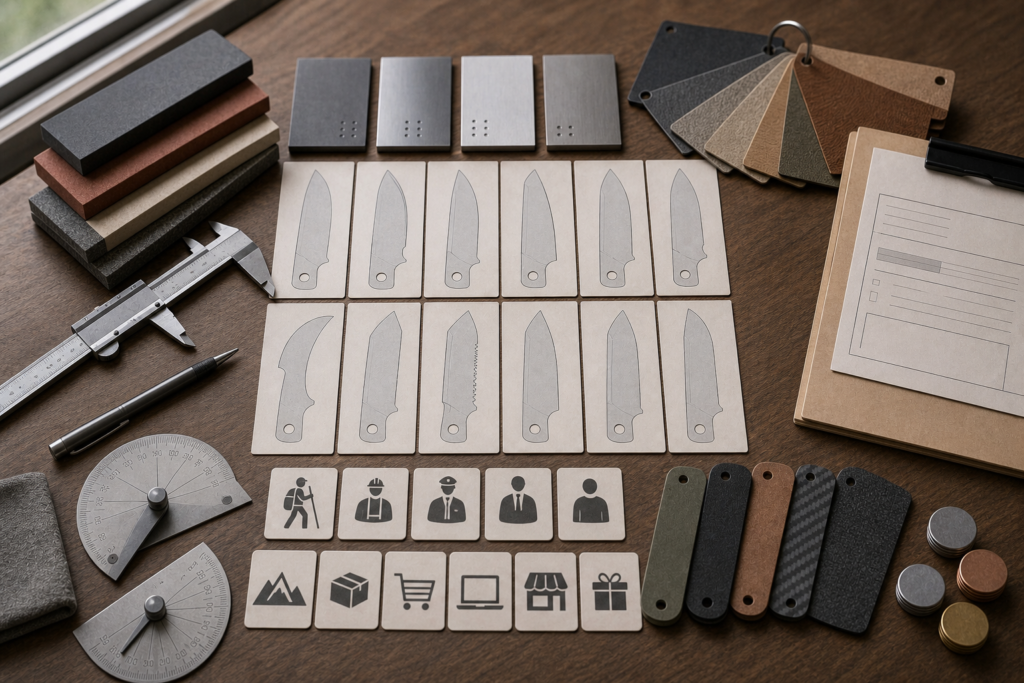
An RFQ that says only "make this blade shape" leaves too much open. I need measurable details to quote and sample well.
A blade shape RFQ should include target market, blade profile drawing, blade length, steel, thickness, grind, edge angle, lock type, handle material, finish, MOQ, target price, packaging, compliance market, and inspection requirements.

I turn a shape request into a production brief
The best blade shape discussion becomes a clear RFQ. I ask buyers to send a blade outline or reference direction, but I also ask for the business target behind it. The target price, expected MOQ, sales channel, and user task tell me whether the shape should be simplified, strengthened, or upgraded. If the buyer has only an idea, I can help turn it into a manufacturable profile. If the buyer already has a drawing, I check whether the pivot, lock face, stop pin, closed position, grind, and sharpening path are realistic.
I also ask for material and process details. Steel grade, hardness target, surface finish, handle material, lock type, washer or bearing direction, screw style, clip requirement, logo method, packaging type, and inspection standard all affect quotation. If the blade has a special profile, I want the buyer to approve both the visual sample and the functional sample. A blade can look right but feel wrong if the grind is too thick, the handle balance is off, or the edge is hard to sharpen.
For repeat orders, the RFQ should become a control document. It should tell the factory what must stay stable from batch to batch.
| RFQ field | What to specify | Why it helps |
|---|---|---|
| Blade profile | Drawing, reference, or target shape | Reduces design ambiguity |
| Geometry | Thickness, grind, edge angle, blade height | Supports cutting feel and QC |
| Product context | Market, channel, target price, MOQ | Keeps design commercially realistic |
| Inspection | Fit, finish, edge, hardness, lockup, packaging | Protects repeat production |
Turn this article into a folding knife project.
Share your blade type, lock direction, steel preference, handle material, quantity, target market, and packaging needs. Vast State can prepare OEM/ODM options.
Conclusion
I choose blade shapes by product fit, geometry, manufacturing risk, and honest claims, not by shape names alone.
Source Notes
- Knife Steel Nerds edge stability supports the need to evaluate edge angle and thickness behind the edge, not only blade shape.
- ISO 9001 in the supply chain supports the need for buyers to make intended use, requirements, inspections, and supplier expectations clear.
- NIST Rockwell hardness guidance supports the point that hardness measurement needs good practice to reduce errors.
- AKTI approved knife definitions provides context for knife terminology and regulatory definitions, but it does not replace local legal review.
- Drop point and clip point pages provide basic public terminology context, not manufacturing-specific proof.